Pages

March 5, 2012

marble crayons

So, these cute little crayons I discovered on pinterest and thought that it would be such a cute idea for my girls. I wish I had thought of this when my daughter was a bit younger because these would be perfect for little hands and they're next to impossible to break since they're so thick and round. Not so easy to put in the mouth and chomp down for a little snack! :)
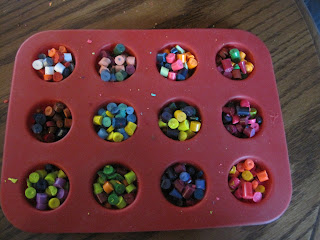
Everything I needed to get the job done... even the smiley little helper in the background! I did buy a whole new box of crayons for this adventure, but feel free to use old broken crayons instead of throwing them away in the garbage. I used a silicone mini muffin tray, a knife to cut the crayons and I lined a plastic cutting board in wax paper, which turned out to be useless in the end since I just cut right through, but it was worth the thought! 

First my daughter, Lexi and I spent a while peeling the paper off the crayons. This took some time and patience, but I used the time to talk to my daughter and learn a little more about her cute, little personality!

Then my other daughter, Kaylin, woke up from her nap, so her job was to pick 4 colours per crayon, so everyone was different. I would cut 1/2 of each crayon picked into little pieces and put them into little prep bowls, as seen above.
Then Lexi would transfer the chopped up crayons into the muffin tray.
Now it was time to put them into an oven preheated at 250.
Leave them for about 15 minutes and then *gently* take them out. Let them cool for about 30 minutes or throw them in the freezer for about 15-20 minutes and pop them out.
Now you have some awesome crayons for your kids or even as a gift for young kids to use! Have Fun!!!

February 11, 2012

Alice in Wonderland mitts

For a long time I've wanted to make myself some awesome mitts. I randomly decided one day to google "Alice in Wonderland mitt patterns" and discovered this pattern by Jennifer Lang. I fell in love instantly. Having never done any "fair isle" type knitting before I thought it would be a great idea to buy this pattern and make myself a pair. 
I knit the "Alice" mitt 3 times total, which was very frustrating, but if I was going to make something that I was going to love so much I didn't want to keep looking at my "Alice" mitt and be disappointed in the appearance of it. I chose to do the "rabbit" mitt in opposite colours because the rabbit is supposed to be white and I like things that aren't "normal" and are a little quirky.
I love how the thumb has a sweet little heart on it and the palm side has roses and leaves. 
I know no-one's ever going to see the lining, but I know it's there and it had to be a bright colour. I was going to use a bright pink or purple, but the shop I bought the yarn at didn't have any of those colours; red was the brightest, but I love them none-the-less! 

All-in-all, these gloves did take a lot of work, but it was so worth it and I absolutely LOVE them! And they are soooo warm which is perfect timing.

January 25, 2012

some sexy granny slippers

For Christmas my friend requested a pair of my slippers. She wanted "vixen slippers", so this is what I came up with.
I found this pattern on etsy and I absolutely love it. I have actually bought a couple patterns from this site. The shop is called mamachee on etsy and the pattern is called oma house slippers. I love them because they're so cute and the pattern is easy to follow.
Over some time I have found lots of flowers on the internet and combined them all to make my own, so honestly I don't know where I can send you to make this and every flower I make is different, but I found this flower pattern from "The Dark Knit" blog which is very close to mine. I can tell you that for this flower the first few flower pedals I want to make pointy because I felt like that was the most vixen looking I could make a crochet flower. So, I normally do 5 triple crochets for each flower pedal and I still did that, but on the third triple crochet I made a little picot. To make a picot, after I finished the third triple crochet I chained 2 and slip stitched in the top of the triple crochet, thus making a picot. Then I just continued on to doing two more triple crochets. Maybe I will make a tutorial next to show how to make my flowers.
For the yarn I used, I just use either Bernat Super Value yarn or Red Heart Super Saver yarn. The best bang for your buck and they have a great selection of colors. I can't remember what brand I used because the tag fell off and I've had it for so long, but there's not a lot of difference between the two.
 I do sell slippers on etsy. Please see my link on the right hand side of my blog. These are my "Vixen granny slippers" on etsy.

January 11, 2012

dr. seuss or whoville gloves that I wish were mine

dr. suess / whoville gloves with liner
 For Christmas I decided to knit my friend some cute gloves. I have a new fascination with knit gloves and when I see a new pattern I have to knit it. This pattern I got from a shop in etsy called janerichmond and the pattern is red is best. This shop is good for cute knits if you're looking for some. For the outside I used debbie stoller full-o-sheep yarn in aquamarine and little lamb. For the liner I used debbie stoller bamboo ewe in (I think) geranium.
 I changed the pattern a bit. The original had the fingerless glove with the flap to cover fingers, but I wanted to add a liner and didn't want to make it more difficult than necessary. Instead of finishing off the ribbed figerless part, I just continued to knit to the top and finished it off the same way she finished the flap. The liner I just attached to the inside and had to do the pattern backwards from what I did for the outside. I love doing my gloves opposite because I feel it adds a little character.
I added a button to one side of the glove and made a button hole two rows up in the ribbing of the other glove so when they are not being worn they can be attached and never have to search for the pair.
All in all, I'm in love with these gloves and hope that my lovely friend loves them too! I am in the process of making new knit gloves that are super cute. I will blog about that later!

January 8, 2012

the afghan i made to spoil myself

good cause crochet afghan

So, all my life I have crocheted, pretty much. Since I started I have always wanted to make my own blanket. It has continuously been a battle of starting and stopping for many reasons (ie. I forget about it, don't like the colors any more... etc.), until now. I made my sister-in-law and brother-in-law a blanket for their wedding and became jealous of their blanket that I had made for them, so I decided it was time to make my own. The pattern I used was called "Good Cause Afghan" from the crochet today "The Ultimate Blankets Handbook" magazine.
 my tower of squares

The pattern asks to do a slip stitch joining technique which looks fine on the front, but once flipped over there's a huge ridge of slip stitches sticking out and I don't think it looks very nice, so I did a little research and found this granny square joining tutorial which I modified a bit to work with my pattern. Instead of doing the 3 dc like the tutorial said, I thought it would look a bit better (since I'm not doing a regular granny square) to do dc2tog and then dc2tog in the other square across. I may try it a bit differently next time, but all-in-all I think it turned out pretty nice.


I like the look of a thick border. I feel like when it's not thick it makes the blanket look unfinished or like maybe someone just rushed it to finish it off, but to me, that's the most important part. I did two rows of DC in off white. Then I did 1 row of HDC in the light grey. Then a row of *HDC, ch1, sk 1* in chartreuse. Then 1 row of 2HDC in ch1 space in light grey. One more row of DC, and one row of HDC in off white.


Now for the finishing touch. I used the bobble-shell edging technique I discovered on the cool blog I just linked you to. 

I love this blanket! My family also loves it, so we have a lot of cuddles in it which makes it all worth while.

January 6, 2012

finally... my blog!

Now that this is a new year, I am hoping to slow my life down a little bit and make more time for the things that matter to me and my family the most. And I am doing this by taking on a new project, a blog! I will try to update as often as I can, but this will be without a whole lot of interruption to my family time, so please bear with me.

Here's to post #1!!!! Yeah!!!